Loading article...
Article content
Introduction
MARVEL Tōkon: Fighting Souls may seem daunting the first time you play.
It is a tag fighting game where four fighters compete against each other while managing gauges, assists flying around, switching of characters, stages changing, and many defensive mechanics on top of basic fighting-game systems.
Fortunately, you do not have to comprehend all of them to start enjoying your game.
The simplest way for a new player would be to choose characters that appeal to you, learn how to control one lead character, learn movement and blocking, one combo, and then start using assists and teamwork.
The following guide will walk you through essential mechanics and equally important - those that you may forget about for now.
Beginner tip: Do not judge your progress by whether you can perform optimized combos. At the start, consistency matters far more than maximum damage.
How Matches Work in MARVEL Tōkon
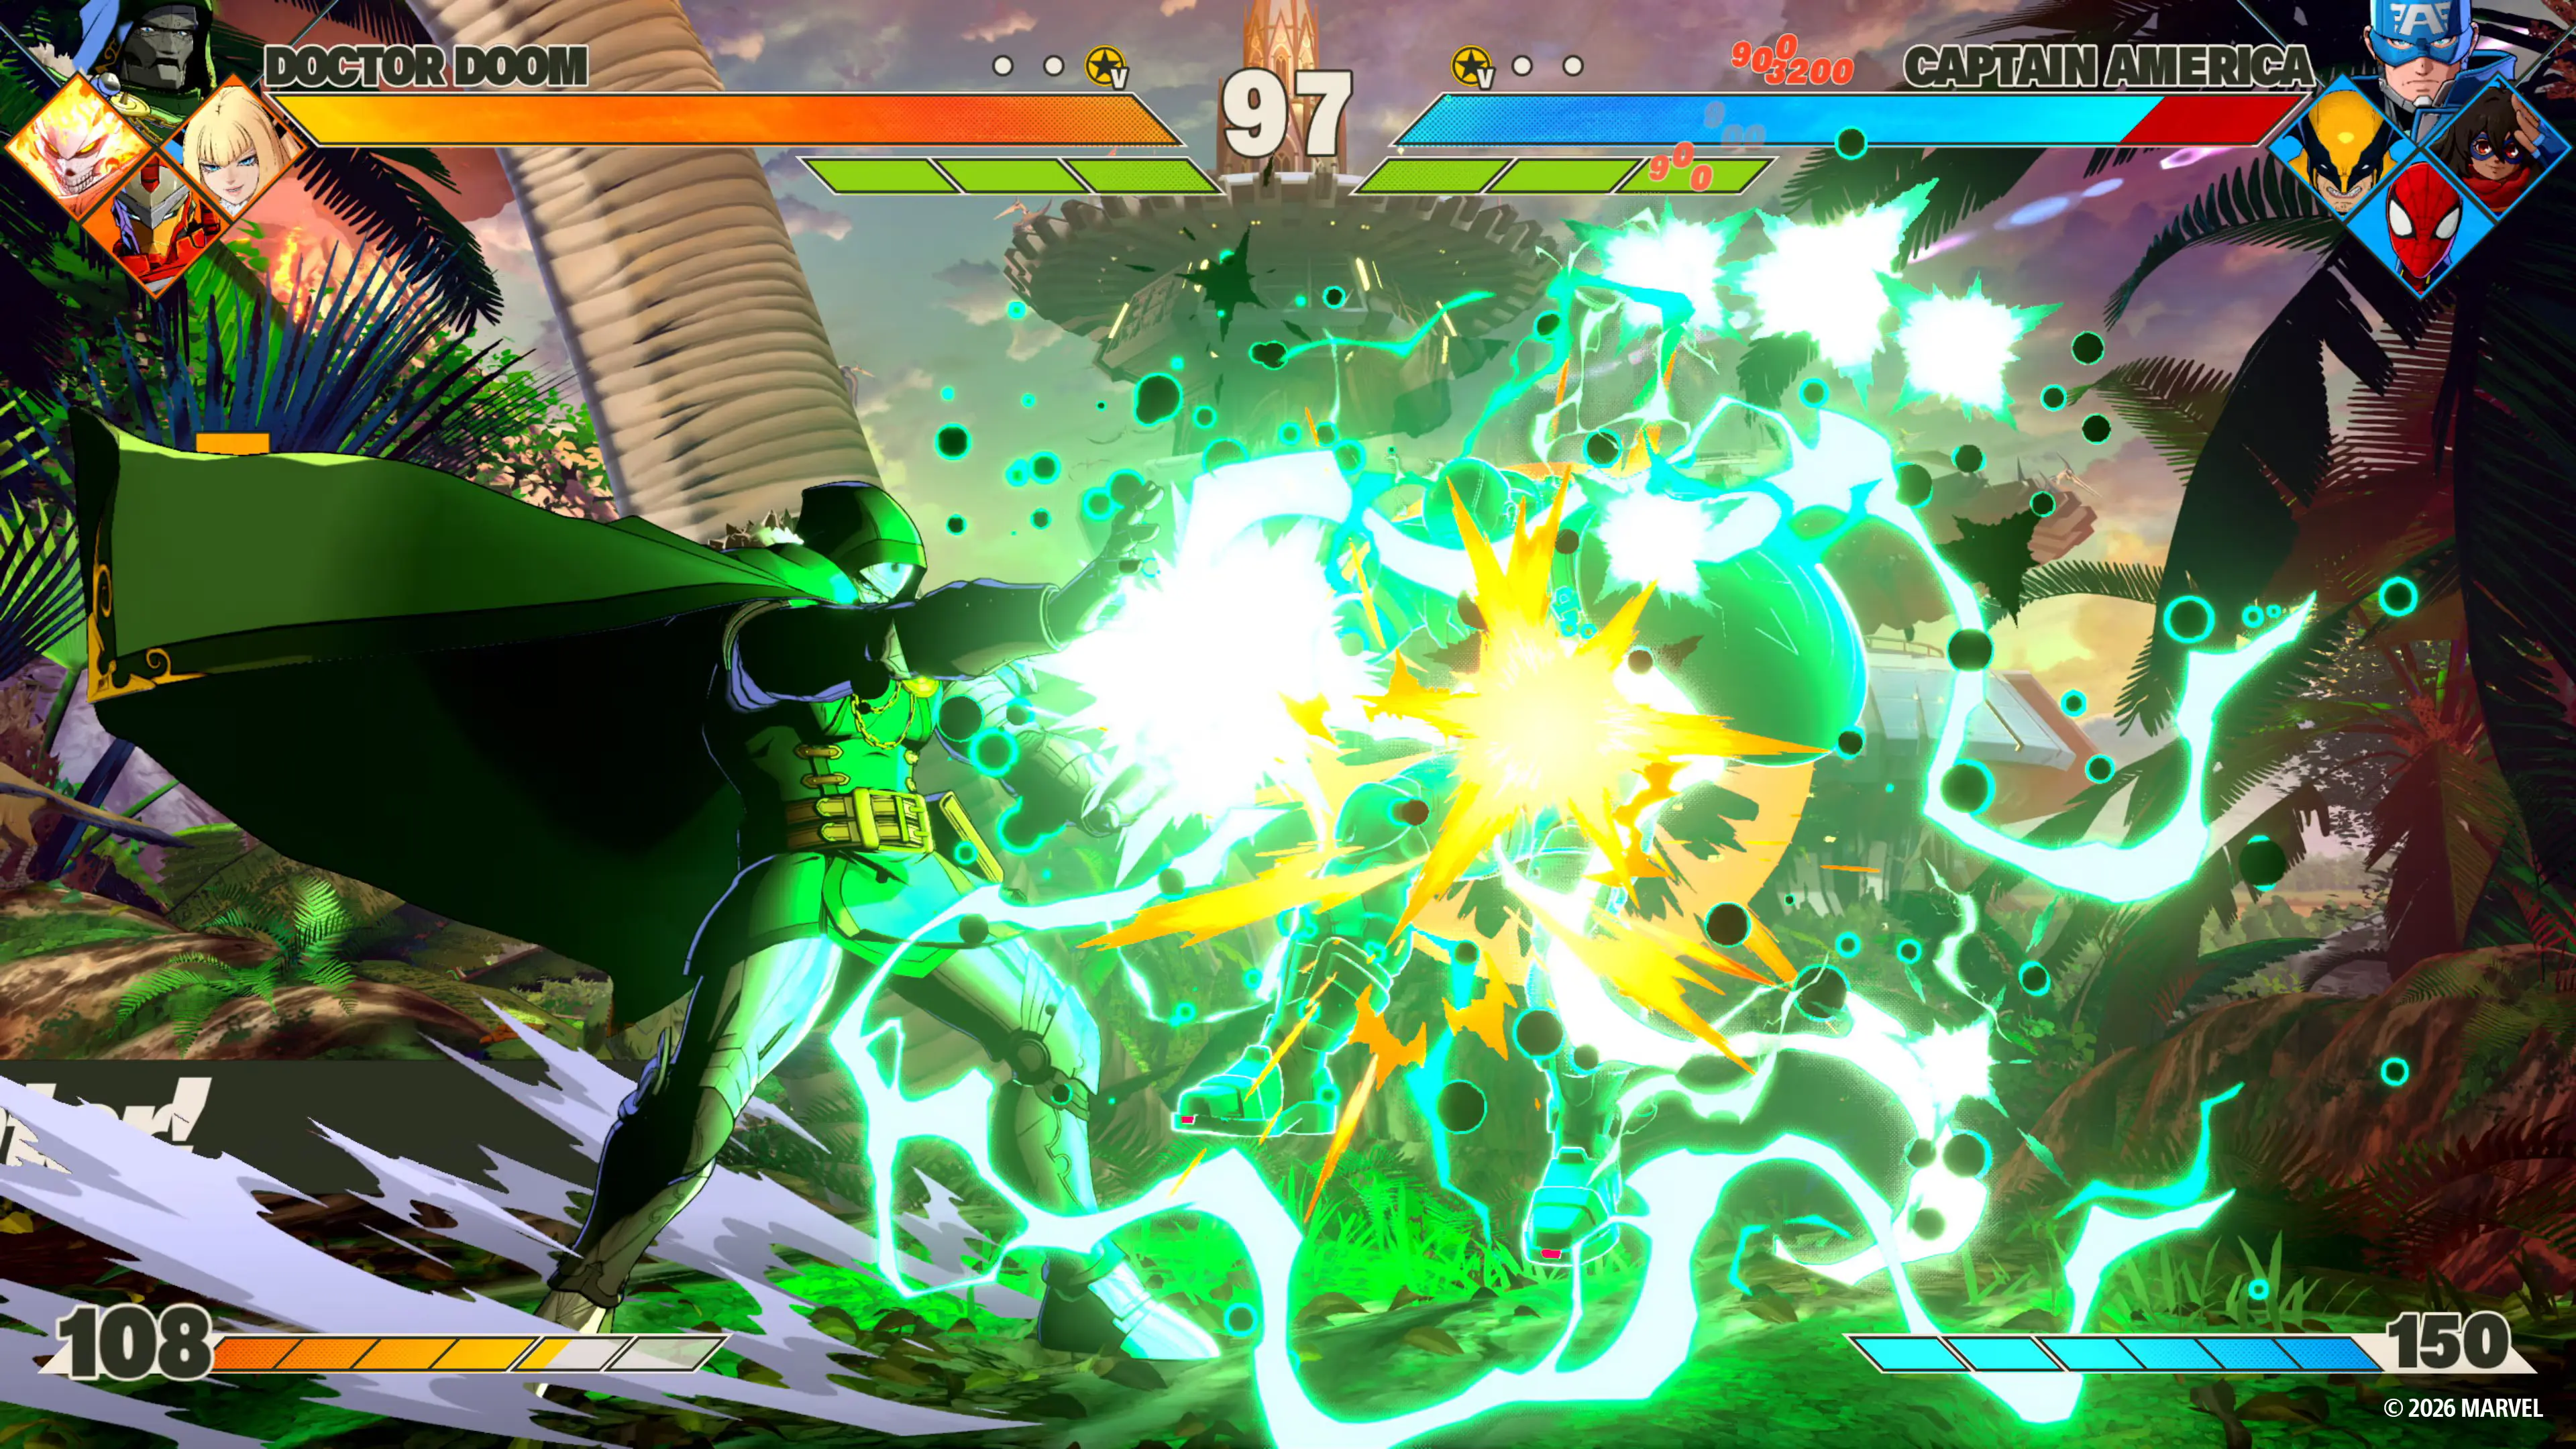
MARVEL Tōkon is a four-player versus game, but unlike most games of this genre, here the players control parties of four characters each, which share a common Vital Gauge, rather than having four separate health bars.
As in other fighting games, the first to reduce the enemy’s gauge to zero wins the round, with matches being typically played in a best-of-five format.
But to start the fight, you only have two of your heroes on the screen, as the battle begins as a 2v2 clash.
The other two members of your party can be summoned later in the battle, for example, when the fight moves to a new stage, when a team reaches one of the corners, or simply when the round starts again. The more characters you have on your side, the higher is your team’s maximum Vital and Skill Gauge.
What beginners should remember
You do not need to think of MARVEL Tōkon as four separate 1v1 characters.
Instead, think of your team as one fighting-game toolkit:
- One character is currently under your direct control.
- Your other characters provide assists.
- Those allies can eventually be tagged in.
- The entire team shares health.
- Team resources determine many of your strongest offensive and defensive options.
Once you understand that basic structure, the rest of the game becomes much easier to follow.
Understanding the Three Main Gauges
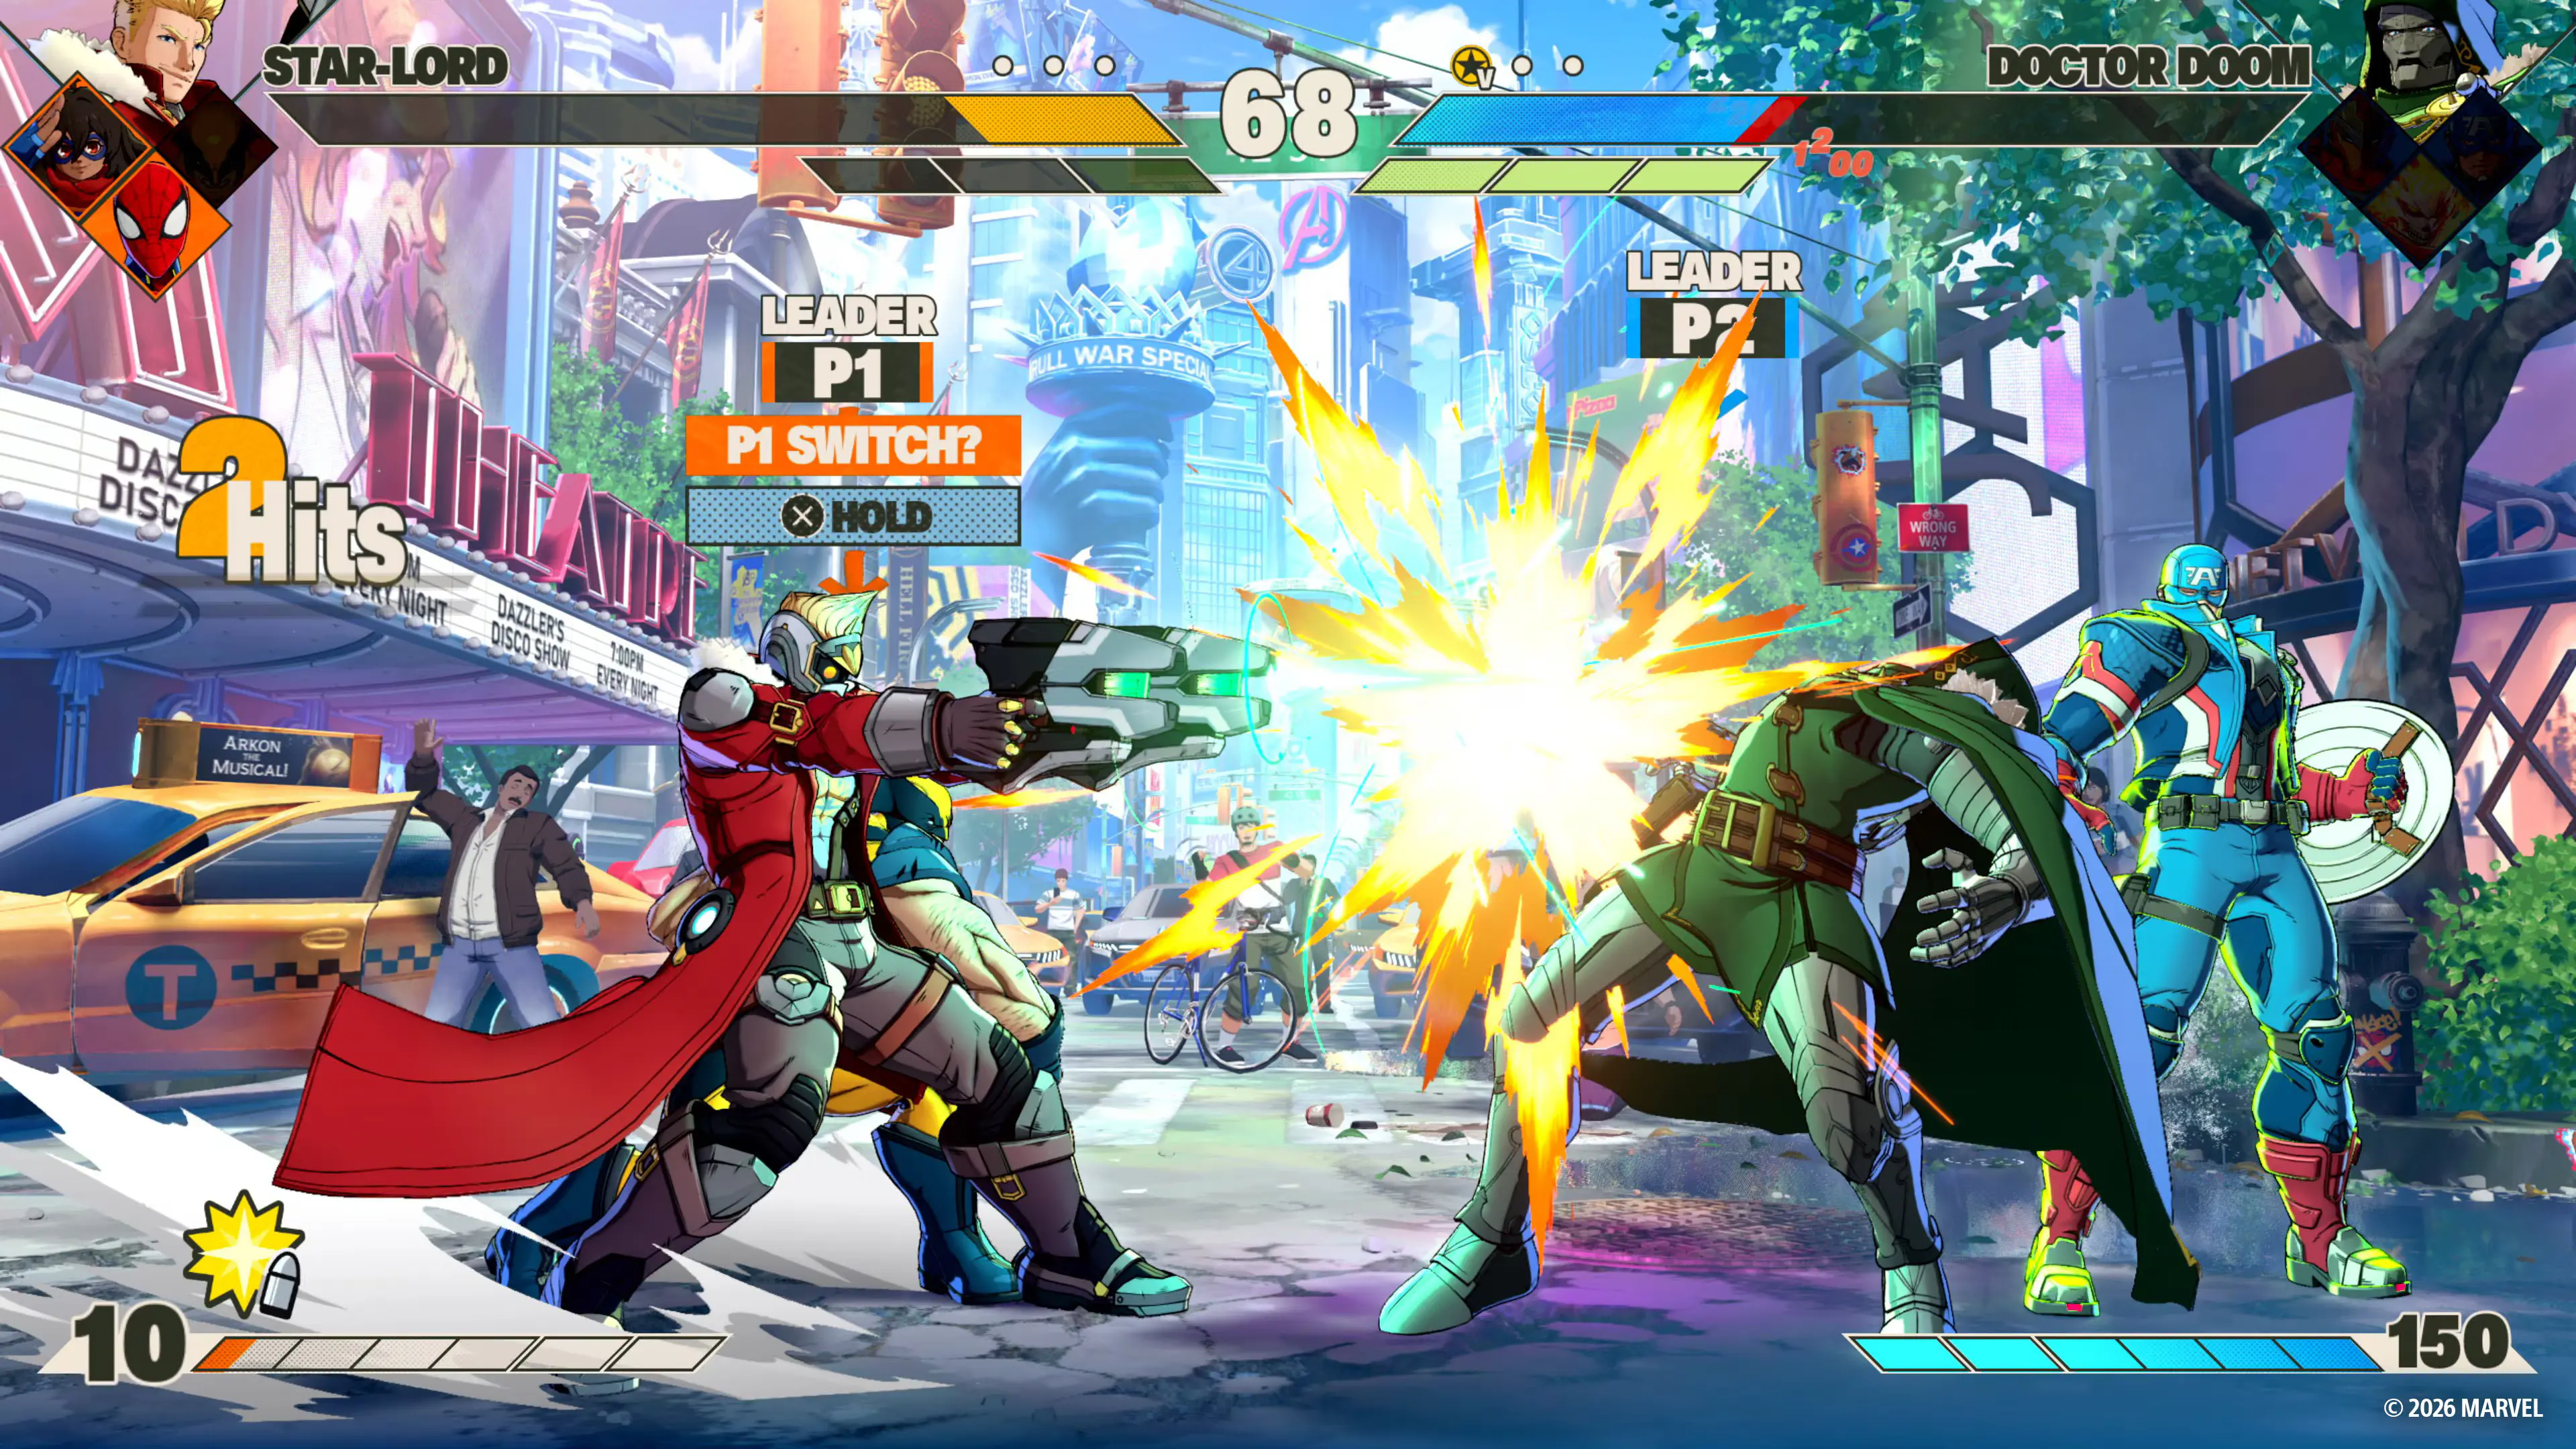
Before learning combos, it helps to understand the three major resources visible on screen.
Vital Gauge
The Vital Gauge represents your team's shared health.
When it reaches zero, you lose the round.
Because health is shared, swapping characters does not function like escaping with a low-health character in some other tag fighters. The entire team is working from the same overall life pool.
Assemble Gauge
The Assemble Gauge sits underneath the Vital Gauge and is primarily used for assist-related mechanics such as:
- Assemble Rush
- Assemble Smash follow-ups
- Assemble Counter
- Other team-based offensive and defensive actions
This makes Assemble Gauge an important resource to manage rather than something you should spend immediately whenever it becomes available.
A beginner who burns all of their Assemble Gauge extending a combo may later find themselves without a useful defensive option.
Skill Gauge
The Skill Gauge is used for more powerful attacks performed by your lead character.
Action | Skill Gauge Cost |
|---|---|
A simple beginner rule is to spend meter when it gives you something meaningful: guaranteed damage, a round-ending opportunity, stronger pressure, or an important momentum swing.
Do not spend resources simply because you have them.
Pick Characters You Actually Want to Play
One of the most useful beginner lessons has nothing to do with frame data or combos:
Do not build your first team around a tier list.
When you are a beginner, the strength of your characters plays a lesser role than the simple fact of having fun controlling them.
We recommend choosing characters you are a fan of, find interesting, or simply enjoy playing rather than immediately chasing the strongest competitive picks.
This tip is especially relevant for MARVEL Tōkon because there is a lot to learn in this game, and it is vital to stay motivated and have fun. Enjoying the characters will give you an added reason to study their skills and synergies.
A simple way to build your first team
Start with one character you are most excited to control. Then look at what the other three characters provide as assists. At a basic level, the game divides several assists into recognizable roles.
Shooter Assist
Shooter Assists generally control horizontal space, often using a projectile or forward-moving attack. They can help your lead character approach an opponent, control neutral, or make it harder for the opponent to move freely.
Vertical Assist
Vertical Assists generally cover the air above or diagonally in front of your character. They can be especially useful against opponents who frequently jump or approach from the air.
Assault Assist
Assault Assists lean more heavily on the unique properties of the assisting character.
Because these assists can vary significantly between characters, they may provide unusual pressure, movement control, combo opportunities, or other utility.
Aerial Assist
Calling an ally while airborne produces an Aerial Assist. These attacks can give your air movement additional coverage and create different offensive routes. You need to focus on understanding these broad assist functions before worrying about complicated team-building theory.
Tip: Your first team does not need perfect synergy. Start with characters you enjoy and ask one simple question about each teammate: “What does this assist help me do?”
Learn One Character Before Trying to Master All Four
A four-character team can create the impression that you need to learn four complete movesets before entering a match.
You do not.
One of the strongest recommendations for new players is to start with a single lead character and treat the rest of your team primarily as assist options while you learn.
Playnoria team recommends entering training mode and getting comfortable with the point or lead character before attempting to learn the whole roster simultaneously. This dramatically reduces the amount of information you need to process.
What to test with your first character
Go into training mode and try every basic attack. Do not worry about creating an optimized combo yet.
Instead, ask:
- How far does my Light attack reach?
- Which Medium feels comfortable at mid-range?
- How slow is my Heavy?
- What happens when I crouch and attack?
- What changes in the air?
Your goal is to begin associating each button with a purpose.
Light, Medium, and Heavy Attacks
MARVEL Tōkon uses three primary normal attack strengths:
Light, Medium, and Heavy.
Each also has variations depending on whether you are standing, crouching, jumping, or combining the attack with a directional input.
Light attacks
Light attacks are generally your fastest normals. The trade-off is shorter range, making them most useful when you are already close to the opponent. Beginning a combo with Light attacks can result in more damage scaling than starting with stronger attacks.
Medium attacks
Medium attacks are typically slower than Lights but cover more distance. They can often be useful combo starters because they provide a good balance between speed, reach, and damage scaling.
Heavy attacks
Heavy attacks are generally slower but provide high damage and considerable range. That does not mean you should constantly press Heavy whenever the opponent is nearby. Slower recovery can make careless Heavy attacks much easier to punish. Use them deliberately rather than relying on them simply because they hit hard.
Common mistake: Treating the biggest button as the best button. Range and damage matter, but so do startup and recovery.
Unique Attacks Give Each Character Their Identity
In addition to standard normals, every character has access to a Unique Attack. These actions are designed around the individual character's abilities and can behave very differently across the roster:
- Captain America throwing his shield along a special trajectory.
- Iron Man firing repulsor blasts.
- Ms. Marvel extending her arm to assist movement.
- Storm creating a gust of wind across the screen.
- Star-Lord changing the element used by his weapon.
Some characters can also modify their Unique Attack with directional inputs.
Do not to memorize every Unique Attack in the game. Instead, learn what your character's Unique Attack contributes.
Does it help you approach?
Does it control space?
Does it defend against projectiles?
Does it change a character-specific resource?
Does it help extend combos?
Understanding that purpose will teach you far more than memorizing the command alone.
Skills, Extra Skills, Supers, and Ultimates
Characters also have their own special moves, called Skills. Skills can be performed through the game's Skill-button system, while command inputs can also be used for many attacks.
Command-input versions deal slightly more damage than their simplified counterparts. That creates an important choice for new players.
Should beginners use simplified inputs?
Yes, if they make the game easier to learn. Easier execution can be worth the relatively small damage trade-off while you are still learning a character. A move that theoretically deals more damage is not useful if you consistently fail to perform it. Start with the control method that gives you confidence.
Once movement, defense, pressure, and combo structure become comfortable, you can gradually incorporate command inputs if you want the additional benefit.
Your First Combos Should Be Simple
One of the easiest traps for a new fighting-game player is opening social media, finding an extremely long combo, and assuming that is what they need to learn first.
It is not.
Prioritize simple, reliable routes that you can execute from common screen positions. The goal is to build confidence and consistency before moving into advanced combo optimization.
MARVEL Tōkon also includes a beginner-friendly Link Attack system.
Light Link Attack route
Repeatedly pressing Light performs a Light route combo. The route can involve allies and eventually finish with a Skill that sends the opponent away. The assist portion becomes stronger as additional allies join your team.
Medium Link Attack route
Repeatedly pressing Medium performs a Medium route that incorporates a Skill and finishes with a Super Skill.
Heavy Link Attack route
Repeatedly pressing Heavy performs a heavier route that incorporates an Extra Skill before ending with an Ultimate Skill. Players can also transition between Link Attack routes during the combo.
For example:
Light → Medium → Heavy
This makes Link Attacks useful for beginners because you can immediately experience the game's combo structure without first memorizing a long sequence of commands.
Learn One Reliable Manual Combo Too
Link Attacks are useful, but eventually you should also practice a simple manual combo.
Light → Medium → Heavy → Skill → Super
Do not treat that sequence as a guaranteed optimized route for every character. Instead, use it to understand the basic theory:
- Confirm that your first attack connected.
- Move through stronger normal attacks.
- Cancel into a Skill.
- Spend meter on a Super when appropriate.
When should you learn more advanced combos?
Only after you can land your basic route during actual matches. Training-mode consistency matters, but executing the same combo while also worrying about movement, blocking, assists, and an unpredictable opponent is a very different challenge. If you can reliably convert real hits into your basic combo, then you are ready to start optimizing.
Slam Launcher and Basic Air Combos
MARVEL Tōkon also provides a straightforward way to launch opponents into the air.
Pressing down + Heavy near an opponent performs a Slam Launcher.
After launching them, you have a limited window to follow the opponent into the air and continue attacking.
Once you have connected several aerial attacks, there are two useful finishers:
- Down + Heavy: A powerful knockdown.
- Forward + Heavy: A blowback attack.
A simple practice routine is:
Slam Launcher → 2–3 comfortable aerial attacks → knockdown
Do not worry about maximum damage initially. Your first objective is simply learning to recognize the launcher and complete the sequence reliably.
How Assists Work
Your teammates are much more than characters waiting to be tagged in. They are active tools that can cover movement, extend combos, protect pressure, and help change the pace of a match.
The input used to call an assist also determines which team slot is summoned:
- Assist or forward + Assist: First ally slot
- Down + Assist: Second ally slot
- Back + Assist: Third ally slot
The ally's team slot affects the type of assist they perform on the ground.
That means team order is strategically important.
Use assists with a purpose
When learning, try assigning one simple function to each assist.
For example:
Assist 1: Help me approach.
Assist 2: Stop opponents from jumping at me.
Assist 3: Help me continue pressure.
You can refine those roles later as you understand the team better.
How to Tag Characters
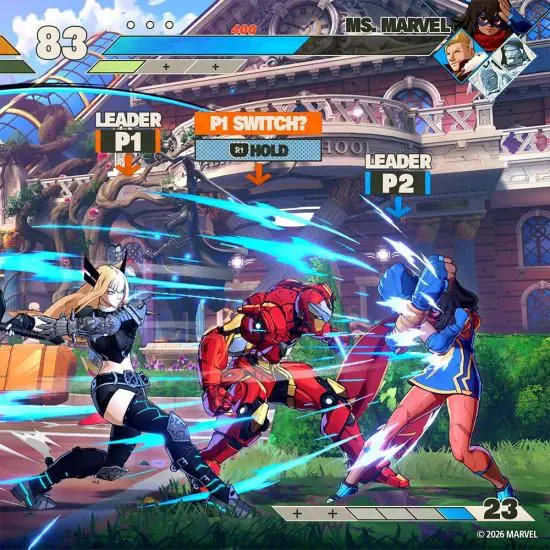
Calling an assist does not require the called character to vanish immediately. MARVEL Tōkon allows you to utilize assist calls as character swaps. There are different methods of tagging. You can hold Assist button as you call an assist, or tap Assist at a certain moment of your ally's attack or standby animation.
If there are multiple allies on the screen, you can call one of them to attack as the latest summoned character. It's possible to tag as well when both the lead character and their assist have been hit. The tag can be canceled when either the tagger or tagged character is struck. This creates an important strategic concept:
Assist calls and character swaps are connected systems.
As you improve, you can use assists not only to attack but also to transition into another character whose tools are better suited to the current situation.
Assemble Rush: The First Team Mechanic to Learn
If there is one assist mechanic beginners should experiment with early, it is Assemble Rush. When your lead character lands an attack, pressing Assist can bring in an ally with a lunging attack. Assemble Rush costs one bar of Assemble Gauge and it's biggest strength is versatility.
You can use it to:
- Extend a combo.
- Add additional damage.
- Continue pressure.
- Help cover an attack that was blocked.
That makes Assemble Rush a natural bridge between basic solo-character offense and MARVEL Tōkon's deeper team systems.
Beginner drill
Practice one simple combo without an assist. Then add Assemble Rush at the same point every time. Do not move it around yet. The goal is to create a repeatable sequence that teaches you the timing of an assist extension.
Assemble Smash
Assemble Smash is a powerful team attack designed to endure incoming hits during much of its startup. When it connects, additional Assemble Gauge can be spent to call allies for follow-up attacks. Each additional ally follow-up costs another bar of Assemble Gauge. The aerial version behaves differently and lunges toward the opponent's position.
Because Assemble Gauge also powers other valuable tools, beginners should avoid automatically spending every available bar on one sequence. Learn what the move does first. Resource optimization can come later.
Assemble Counter
Assemble Counter gives you another way to challenge an opponent's offense:
Back + Assist + Light
It costs one bar of Assemble Gauge and is designed to endure an incoming attack before counterattacking with an ally. However, there is an important downside: If the counter misses, you are left vulnerable.
That means Assemble Counter should not become a panic button that you press every time an opponent begins attacking. Good opponents will eventually notice the habit and deliberately bait it.
Tip: Defensive mechanics become weaker when the opponent knows exactly when you will use them. Alternate between normal blocking and active defensive options.
Super Assemble
Super Assemble allows another teammate to add their Super Skill while your current character is already performing a Super. After the sequence, the called-in ally becomes the new lead character. Super Assemble can be used up to twice consecutively, potentially allowing three characters to perform their Supers in one sequence. Each additional activation costs 50 Skill Gauge.
This makes Super Assemble potentially powerful, but it also consumes substantial resources.
You do not need to prioritize mastering it immediately. First become comfortable with:
- Basic Supers
- Assist calls
- Tagging
- Watching your Skill Gauge
Then introduce Super Assemble once those systems make sense individually.
Crossover, Crossover Reflect, and Perfect Reflect
MARVEL Tōkon also includes deeper defensive interactions built around Crossover.
Crossover
Crossover can be performed while blocking and calls an ally in to interrupt the opponent's offense.
It can help shift momentum from defense back toward offense.
Crossover Reflect
The attacking player can respond to Crossover with their own Crossover Reflect. This introduces a layer of counterplay: the defender's attempt to escape pressure can itself be challenged.
Perfect Reflect
Performing the reflect with precise timing produces a Perfect Reflect. A successful Perfect Reflect counterattacks the opponent and assisting character and temporarily prevents the opposing player from calling assists. That can be extremely powerful in a game built around team interaction. It is also described as difficult to perform consistently.
Do you need Perfect Reflect as a beginner?
No. Perfect Reflect can come later.
You should understand that the mechanic exists, particularly so you know what happened when another player uses it against you. But there are much more important things to practice first:
- Movement
- Blocking
- One combo
- One assist extension
- One defensive option
Learn One Safe Block String
Landing a hit is only one part of offense. Often, your opponent will block. A sequence of attacks designed to maintain pressure against a blocking opponent is commonly called a block string.
You do not need complicated pressure immediately. Start by finding one sequence that ends safely. You can find training-mode test handy for this.
How to test whether your block string is safe?
- Set the training opponent to block.
- Set the opponent to counterattack after blocking with a fast Light or Medium attack.
- Perform your block string.
- Immediately try to block after your final move.
- If the opponent's counterattack hits you, experiment with a different ending.
This teaches you something more valuable than memorizing a list of numbers: which attacks let you safely finish your pressure.
Plus and Minus Frames, Explained Simply
Eventually you will hear players describe moves as plus or minus. You do not need an advanced understanding of frame data to begin playing. At a basic level:
Plus means your character recovers before the opponent.
Minus means the opponent recovers before you.
That helps determine whose action can come out first after a blocked attack. But do not turn this into an overly simple rule such as “plus means attack and minus means stop.” The actual situation can also depend on:
- Distance
- Pushback
- Attack speed
- Available defensive options
- Character-specific mechanics
Training mode can help you test these situations directly. The goal for beginners is not to memorize the entire frame-data table. Learn which of your attacks are safe, which are risky, and which leave you in a strong position.
A 20-Minute Beginner Training Routine
If you are unsure what to do in training mode, use this routine.
Minutes 1–4: Movement
Practice:
- Forward dash
- Back dash
- Jump
- High jump
- Double jump
Do not attack yet. Focus on stopping where you intended to stop.
Minutes 5–8: Normal attacks
Test each standing, crouching, and jumping normal. Try to identify:
- Your fastest close-range button
- Your most comfortable mid-range attack
- A useful anti-air
- A long-range poke
Minutes 9–12: Skills
Perform every Skill several times. Do not worry about combos. Instead, learn what each Skill does and where it places you afterward.
Minutes 13–16: One combo
Choose either:
- A Link Attack route, or
- One simple manual combo
Perform it repeatedly until you can complete it ten times without a mistake.
Minutes 17–18: Add an assist
Take the same combo and add one assist extension. Assemble Rush is a good place to begin.
Minutes 19–20: Defense
Set the training dummy to attack. Practice blocking the sequence. Then experiment with Assemble Counter or another defensive option.
Common Beginner Mistakes to Avoid
Trying to learn all four characters immediately
You can play effectively while initially understanding one character much more deeply than the others. Build outward gradually.
Picking characters only because they are considered strong
A character you enjoy practicing is usually a better first choice than a theoretically stronger character you do not enjoy.
Constantly throwing out Heavy attacks
Heavy attacks can have great range and damage, but their slower recovery can also create obvious punish opportunities.
Practicing difficult combos too early
A 30-hit combo that works once every ten attempts is less useful than a basic route you land almost every time. Develop consistency before moving to intermediate and advanced combo routes.
Spending every resource offensively
Assemble Gauge has defensive applications too. Leaving yourself completely empty may remove an important escape option.
Calling assists randomly
Every assist call should solve a problem. Ask yourself whether you are using it to approach, cover space, extend pressure, extend a combo, or create a tag opportunity.
Using Assemble Counter every time you are pressured
Predictable defensive habits can be baited. Sometimes the correct defensive decision is simply to block.
Trying to master Perfect Reflect immediately
Perfect Reflect is powerful, but it is not a beginner fundamental. Movement and basic defense should come first.
Numpad Notation: The Fighting-Game Language Worth Knowing
MARVEL Tōkon supports accessible Skill inputs, so you do not need numpad notation simply to play. However, you are likely to encounter it in combo guides, community discussions, tournaments, videos, and social-media posts. Numpad notation is widely used in fighting-game communities because numbers provide a convenient way to communicate directional inputs across languages.
The notation is based on a keyboard numpad:
Assuming your character faces right:
- 5 = Neutral
- 6 = Forward
- 4 = Back
- 2
You do not need to memorize everything immediately.
If you can recognize 2, 4, 6, 8, 236, and 214, you will already understand a large portion of common fighting-game notation.
What Should You Learn First?
MARVEL Tōkon has enough mechanics to keep experienced fighting-game players learning for a long time. That does not mean every mechanic deserves equal attention on day one.
For a new player, this is a sensible progression:
- Learn how to move and block.
- Pick one lead character.
- Learn what that character's normals and Skills do.
- Practice one simple combo.
- Learn your three assist calls.
The important part is not how quickly you reach step 12. It is whether each previous step feels comfortable enough that you can use it during a real match.
Final Tips for New MARVEL Tōkon Players
MARVEL Tōkon may be a 4v4 fighting game, but beginners should resist the urge to learn four characters and every system simultaneously.
Start small.
Pick characters you genuinely want to play. Learn one lead character. Understand what your assists do. Build one reliable combo. Learn to block before relying on elaborate defensive mechanics. Spend your resources deliberately instead of automatically. Most importantly, focus on actions you can reproduce consistently.
Advanced combo routes, optimized team compositions, Perfect Reflect timing, matchup knowledge, and detailed frame data will all become useful later. For your first matches, you only need enough knowledge to understand what your character is trying to do and enough confidence to actually do it. From there, you can build the rest of your team one mechanic at a time.
Quick Beginner Checklist
Before jumping into online matches, try to answer yes to these questions:
- I know how a round is won.
- I understand the Vital, Assemble, and Skill Gauges.
- I know which character I want to use as my lead.
- I know my lead character's basic normals and Skills.
- I can perform one reliable combo.
If most of those feel comfortable, you already know enough to start playing and learning through actual matches.